iOS Key Concepts and User Guide for Coaches

Key Concepts
Activity Feed (Recent Activity)
- 3D FAQs
- How to enable 3D and download the latest AI models (if needed)
- Using 3D data and visualization
- Kinematic Sequence
Sending Invitations / Sharing videos outside of the app
Sharing Options / Exporting Videos
User Guide
"+" (Add an individual or team workspace, join using invite code)
Long-pressing a Video Thumbnail
Long-pressing an Individual Workspace name
Long-pressing an Individual Member’s name in a Team or Individual workspace
App Feature Comparison: iOS vs Android
Key Concepts
Recommended Spec Requirements
Coaches require an Apple device for full functionality, while the app offers limited features on Android. Athletes can utilize the app on either Apple or Android devices.
iOS Recommendations: For Coaches & Athletes for all features
- Mac: macOS 15.0 or later and a Mac running an M1 chipset or newer
- iPhone: iOS 18.0 or later, 14 Pro with A16 Bionic Chip or newer
- iPad: iPad OS 18.0 or later, M1 chipset or newer (newer Pro models)
-
Apple Watch: watchOS 9.4 or later (companion)
Android Recommendations: Coach and Athletes with limited features
-
Android 12.0 or newer
Web App: For Coaches & Athletes with limited features
Chrome browser - https://app.getonform.com/ (companion)
Account Creation
Onform supports multiple secure sign-in methods: Single Sign-On (SSO) via Apple, Google, or Microsoft, or email-based sign-in using a one-time verification code. Both methods eliminate the need to create and manage a separate password, improving data privacy and login efficiency.
Email Sign-In: You can now create an account or sign in with just your email address. When you enter your email, Onform sends a one-time code to your inbox. Enter that code to verify your identity and access your account—no password required.

Privacy Commitment: Your email address is used strictly for authentication. Onform does not share or sell your personal data.
Email Communication: When you send invitations or share files externally, the app hands the task off to your device's locally configured email client (e.g., Apple Mail or Outlook).
Reliability: This approach ensures high delivery rates and keeps messages from being flagged as spam. You can configure your device's email client to send from any address you choose, regardless of your sign-in ID.
Library - All Files
The Library - All Files serves as your master repository, consolidating every video you have recorded, imported, or shared across all individual and team workspaces.
- Privacy: This library is strictly private to your account and cannot be shared as a complete directory.
- Utility: It provides a centralized location for searching, managing, and performing side-by-side comparisons of videos across your entire roster of athletes.
Note: Pulling down th pane in any Library allows you to jump to a date. Dates with videos will be shown circled.
Reference Content Library
The Reference Content Library is a dedicated storage space for your most frequently used drills, model swings, and instructional videos, ensuring they are always available for rapid deployment.
- Storage Behavior: Unlike other sections of the app, videos in this library are not affected by the Local Cache Setting. They remain on your local device storage permanently until they are manually deleted or the entire app cache is cleared.
- Sharing Protocols: While the library itself is private and cannot be shared as a whole, individual or bulk-selected videos within it can be shared with any athlete or workspace as needed.
Recent Activity
The Recent Activity feed provides a unified stream of your latest interactions, eliminating the need to navigate between separate workspaces to track updates. When a notification is received, it is automatically archived here for future reference.
Available Updates:
- All: All updates in one view.
- Messages: View and respond to all recent conversations with individual athletes or teams from one central location.
- Reactions: See all reactions to your messages in one place.
- Joins: All workspace join notifications reside here.
- Watched: See who watched a video and which video was watched.
- Shared Files: Newly shared file notifications live here, along with the workspace location where the file was shared.
- @Mentions: Any message that tags you appears here.
- Workspace Uploads: Instantly access the newest files added to any of your active workspaces.
Together, these updates let you monitor engagement across your workspaces—tracking which videos athletes have viewed, staying on top of reactions and new joins, and keeping informed on all relevant interactions without missing critical data.
Calendar Integration
Collections
Collections are organizational tools that let you customize your workspace view by grouping individuals and teams. This feature provides a tailored dashboard experience, allowing you to quickly navigate to the specific athletes or groups you manage most frequently.
- Customization: Access these settings by tapping the "Edit" link on the Home Screen. From here, you can create, hide, show, or reorder your collections based on your personal preference.
- Management: You can add new individuals or teams, and edit existing collection members, in this menu by tapping the 'more' icon at the end of each Collection name.
All Individuals Collection
The All Individuals Collection serves as the primary directory for all the individual workspaces you have created.
- Organization: Workspaces are automatically listed alphabetically by the athlete's first name.
- Interface Control: For a cleaner Home Screen, this collection can be collapsed or expanded as needed.
- Creation: To add a new individual workspace to this collection, tap the "+" icon located at the top of your Home Screen.
All Teams Collection
The All Teams Collection acts as the central hub for all team-based workspaces within the app.
- Organization: Teams are organized alphabetically by their designated team name.
- Interface Control: Like individual collections, the team view can be collapsed or expanded to save screen space.
- Creation: To establish a new team workspace, tap the "+" icon at the top of your Home Screen.
Workspaces
A Workspace is a dedicated environment designed for collaboration and communication. It functions as a virtual meeting room where athletes, parents, and coaches can interact. Onform provides two distinct workspace types to accommodate different training environments.
Individual Workspace '...' (More Icon)
When an individual workspace is active, tapping the "..." (More Icon) provides administrative tools to manage the athlete’s experience.
| Feature | Description |
| Invite/Reinvite | (Re)Send a workspace invitation to the athlete. |
| Edit Details | Modify member roles or update the workspace name. |
| Library Settings | Toggle the Workspace Library between Default Shared and Default Private. |
| Add New Person | Invite parents or external coaches to the workspace. |
| Add Existing Member | Instantly create an individual workspace for someone already in your organization without requiring a new invite. |
| Leave/Delete | Exit the workspace or permanently remove it from the system. |
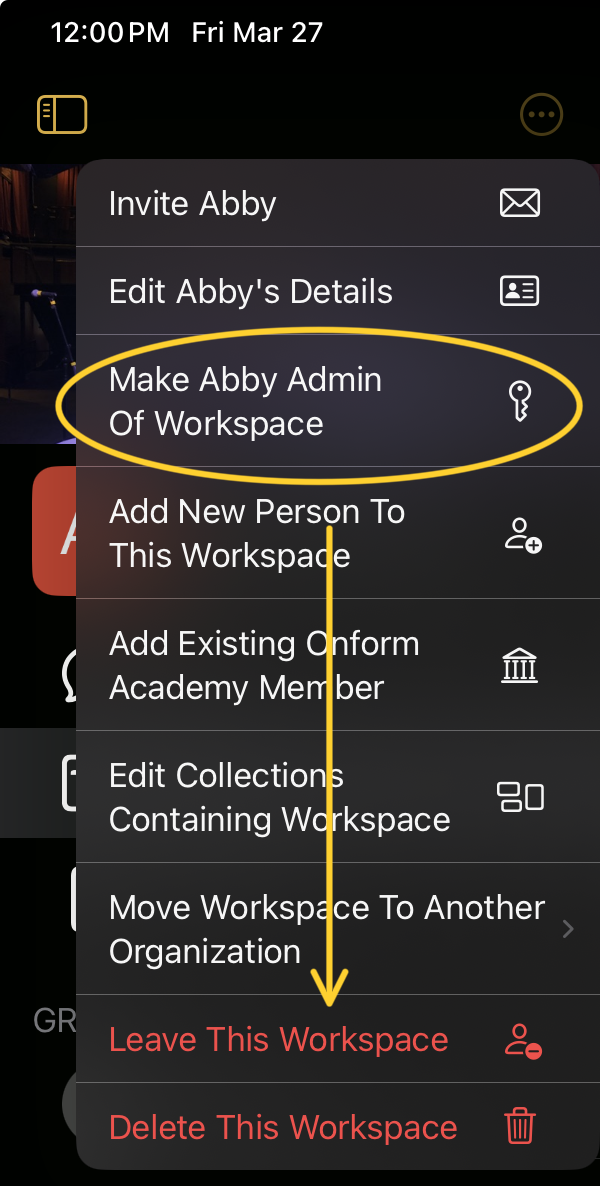
Important Note: Deleting a workspace permanently revokes access for both you and the athlete to all shared videos.
If you wish to "hand over" the workspace to another coach or athelte athlete while you disconnect from it, follow these steps to keep their data intact:
- Tap the More icon and select Make Admin of Workspace to grant the athlete administrative control.
- Once they are an Admin, tap the More icon again and select Leave the Workspace.
Team Workspace "..." (more icon)
-
The Team Workspace includes specialized tools for managing groups of athletes simultaneously. Tapping the "..." (More Icon) within a team view unlocks the following options:
Profile & Settings
- Edit Team Profile: Customize the workspace by setting or changing the background image.
- Update Team Name: Modify the public-facing name of the team.
-
Library Privacy: Adjust the default visibility settings for files uploaded to the team library.
Member Management
- Bulk Invite Athletes: Streamline onboarding by inviting multiple athletes to the team at once.
-
Add Existing Member: Quickly pull athletes from other teams or individual workspaces into this new group. The workspace will automatically appear in their account—no additional invitation is necessary.
Workspace Maintenance
- Leave This Workspace: Remove your own access while keeping the team intact for others.
- Delete This Workspace: Permanently delete the team workspace and all associated data.
Important Note: Deleting a workspace permanently revokes access for both you and the athlete to all shared videos.
If you wish to "hand over" the workspace to another coach or athlete while you disconnect from it, follow these steps to keep their data intact:
- Tap the More icon and select a member to Make Admin of Workspace to grant them administrative control.
- Once they are an Admin, tap the More icon again and select Leave the Workspace.
3D visualization
Onform's new 3D visualization is now available to all coaching users in 'beta testing' mode. During this time, the feature is available to anyone with an Onform 'Coach' account. The 3D skeleton is computed entirely on the device itself. As such, a newer iPad or iPhone (currently only supported on iOS devices) will be required. Your device must be running iOS version 17.x or later, with an M2 chipset (iPhone 14 or later). You want to ensure that you are now recording at 120 FPS. Currently, Onform's 3D visualization capability is available only for full golf swings. Many more sports will be added in the future.
Getting Started
You'll need to use the Auto-Detect recording mode (shown below) within Onform to capture a golf swing from the face-on or down-the-line angle. Simply position the golfer in view and have them take a full swing.

Once captured using Auto-Detect, the 3D visualization will be computed automatically and played back in slow motion. You can use your finger to drag the 3D skeleton and rotate it to any angle.
Additional visualizations include Hand Path, Slide and Sway tracking and many more coming soon. To access these visualizations, tap the 'magic AI' button and select which visuals you'd like to show as shown below.

3D can be combined with our multi-cam recording capability as well. Simply add other devices by choosing the 'auxiliary' camera mode within the additional device, which will pair to the primary device recording the auto-detect full swing.
3D FAQ's
How do I get 3D to work?
Record a golf swing using the Auto-detect recording mode within Onform and 3D will automatically be computed. We recommend using an iPhone 14 or newer or a 2020 iPad or newer for best results.
Where is the data for the swing?
As of March 1, 2025, our 3D visualization does not display data associated with the 3D skeleton. For now, we are holding back providing the data until we have further validation against a known 'ground truth' system. We're benchmarking our 3D data against lab-grade markered, optical motion capture systems: Qualisys, Optitrack, GEARS/Vicon and AMM systems. Once we're confident of our data we will enable the data visibility in a future update. In addition, we will publish our statistical error range so you can be sure of high quality and accuracy. Since we released this feature as a 'beta', know that we are working continuously to improve it and enable accurate data for key body metrics. Stay tuned!
Do I have to be connected to internet?
No. We don't require the internet when computing the 3D model, so you are free to use it completely offline.
Can I capture from any angle?
We designed the feature to be used when recording from face-on or down-the-line, so we recommend capturing from those angles.
Does the iPhone or iPad have to be on a tripod to work properly?
No, you can simply hold the device and capture like a normal video. Of course it helps to be still, but you don't have to be 'tripod still'.
What can I do with the 3D information?
The visualization is a great help to better understanding the mechanics of a golf swing. For instance, enabling the hand-path visualization helps a student to better see their clubpath, and help diagnose reasons for slices and hooks. You can also use it to see setup stance, takeaway and other key aspects of the swing. With the forthcoming data, you'll be able to compare objective information before and after making swing changes.
Can I use 3D with multiple cameras?
Yes! You can easily use our multi-camera features with 3D. At this time, simply set your primary camera to 'Auto-detect' and the other cameras to 'Auxiliary'. You'll get amazing multi-angle recordings with 3D! Below is an example of using 3 cameras (2 iPhones and 1 iPad in this case) to capture face-on, down-the-line and impact, along with the 3D view. You can adjust the view panes with the 'layout' button in the lower right corner as seen below.

How to enable 3D and download the latest AI models (if needed)
Onform can generate full 3D visualizations and 12 data metrics from a single 2d video recording of a golf swing. Simply record a swing at 120 or 240 fps then tap the '3D' view pane in the video player to compute 3D. The video player remembers the last setting used, so if you don't want to generate 3D for every swing, simply de-select the '3D' view pane or change the Layout (button in lower right corner of video player) to a 'one-pane view' and select just the '1' camera angle.

Update AI Models
If needed, you can download the latest AI models by accessing Onform's settings and scroll down toward the bottom of the screen, you'll find an option to "Download the latest AI models". Tapping that button will start the download, approximately 350Mb of data so it will take a while on slower connections. You will receive a notice when completed.


Using 3D data and visualization
Onform 3D is a powerful way to visualize a golf swing and obtain objective data for key body metrics. We've worked to deliver a reliable solution that does not require an internet connection, takes around 10 seconds to compute on an iPhone 16 Pro and provides comparable data to much more expensive systems traditionally only available in a lab or indoor studio. 3D data is only available to coaches at this time, thus students/golfers will be able to visualize the 3D skeleton but won't have access to the data.

Using the feature is simple, record a full swing from the face-on angle of a golfer, with the body of the golfer fully in the view at 120 or 240fps. You can hold the camera, or put it on a tripod for improved results, and you can use our multicam system (a primary iOS camera connected to an aux iOS camera) as well.
Like all tools, using it properly takes a little care to ensure reliable and consistent results. These suggestions apply to regular "2D" video recording as well:
- Angles matter. You must capture a face-on video of the golfer taking a full swing using 120fps recording rate. Take care to position your camera at a 90 degree angle from the user approximately hip height. See our blog post on recording best practices for how to do a proper recording. You can import existing swings as long as they meet the same criteria. It's difficult to ascertain the recording angle of imported video, so please be cognizant that data calculation is sensitive to recording angle.
- We recommend using the Onform app to do your recording. While it can work with imported video, results may not be consistent. You'll need to record at 120fps or higher, and we suggest using our shutter speed tools to capture the best stop-motion video with the least amount of motion blur.
- Our model is trained to work best with a full golf swing. While it is very flexible, it has limitations and constraints. See our model card for technical details on how it was created and key details.
- In a multicam recording, the face-on angle will be used for all metrics calculations and supplemented with thrust data from the down the line camera.
- You should have decent lighting on your subject. Again, we've built-in very adaptable AI engine that works in many lighting conditions, but ample "good" light is suggested for best results.
- Try to limit people appearing the background of the recorded video. Understandably, it's sometimes impossible to avoid especially on an outdoor driving range. If possible, make sure the people that are in the background are a signficant distance away so that the subject golfer appears much larger than the background people. We've added filtering to focus on the largest subject in frame, but as with the other suggestions, it's best to have no other person in frame if it can be avoided.
Body Metrics
Understanding the 12 different body metrics available for 3D is critical for getting the most out of this amazingly powerful set of tools. In addition to our model card, which summarizes the key use cases, applicability, capability and accuracy of our model, the terms below are defined to provide better understanding of exactly what is being measured
1. Torso Turn Axial rotation of the upper trunk about the upper spine axis defined by the line between mid spine and neck joints.
2. Torso Forward Bend Rotation of the upper trunk about the lateral axis, relative to vertical in the sagittal plane.
3. Torso Side Bend Rotation of the upper trunk about the longitudinal axis, relative to vertical in the frontal plane.
4. Pelvis Turn Axial rotation of the pelvis about the lower spine axis, defined by the line between mid pelvis and mid spine.
5. Torso Sway Lateral (target-to-away) translation of the torso center in the frontal plane, relative to address position.
6. Torso Thrust Anterior–posterior translation of the torso center in the sagittal plane, relative to address position.
7. Torso Lift Vertical displacement of the torso center, relative to address position.
8. Pelvis Sway Lateral (target-to-away) translation of the pelvis center in the frontal plane, relative to address position.
9. Pelvis Thrust Anterior–posterior translation of the pelvis center in the sagittal plane, relative to address position.
10. Pelvis Lift Vertical displacement of the pelvis center, relative to address position.
11. X-Factor The difference in the axial rotational angles between the torso and pelvis, representing coil at the top of the backswing.
12. Swing Tempo The ratio of backswing time to downswing time, defined as backswing duration divided by downswing duration.
Below is a reference guide for the terms used in the above descriptions.

Customizing Body Metrics:
After calculating 3D data by selecting the 3D angle in the camera view, the user is presented with the data tiles for each metric at the bottom of the video player. Tapping on the metrics brings up a panel to manage which metrics are visible. You can also long press on a data tile and drag it to change the order that the metrics are displayed. In addition, the golfer's height and units for translational metrics like sway can also be selected. Note that the metrics are only displayed only for coaches at this time.

If you would prefer not to show the metrics at all, tap the 'Layout' button in the lower right corner of the video. Students / clients will not have access to computing the metrics and will only see them if you include metrics in a shared voiceover recording.

Check our 3D FAQs for more information
Kinematic Sequence
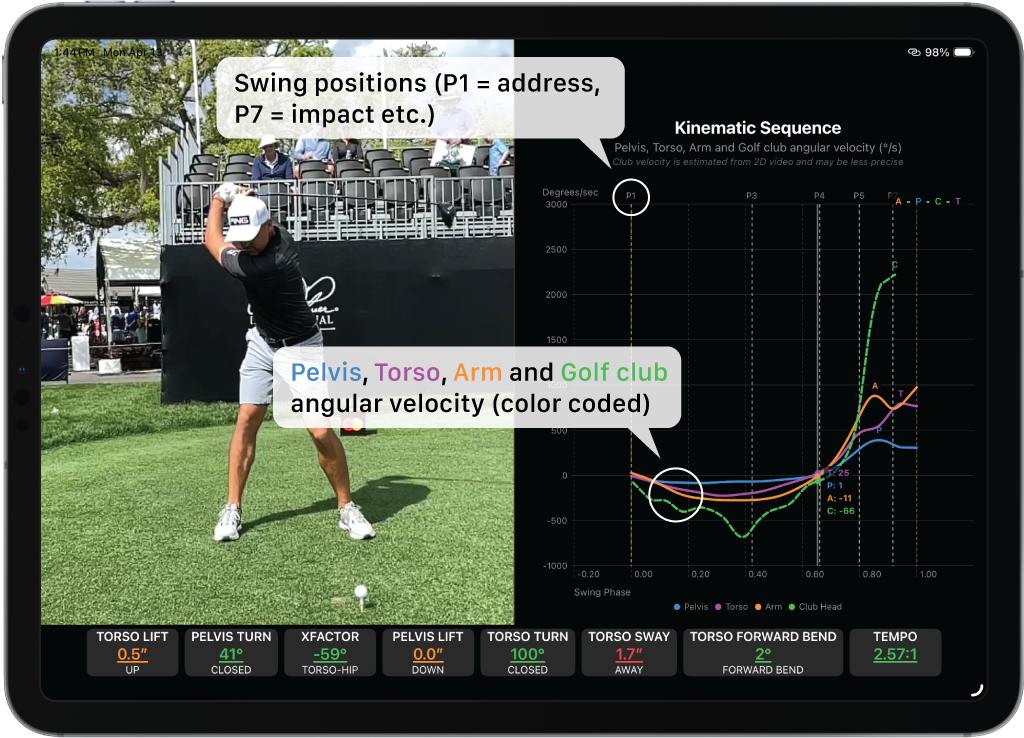
The kinematic sequence describes the order and timing in which different body segments accelerate during the golf swing. It is visualized by plotting the angular velocities of key body segments throughout the swing.
In an efficient golf swing, rotational energy is generated by the body and transferred sequentially through the kinetic chain — from the lower body to the club. This results in a characteristic pattern where the pelvis accelerates first, followed by the torso, arms, and finally the club.
Analyzing the kinematic sequence provides valuable insight into how a golfer generates power and how effectively that power is transferred through the body.
Deviations from the typical sequence pattern may indicate issues such as inefficient timing between segments, poor energy transfer, or compensatory movement patterns.
Understanding the Segments of the Kinematic Sequence
The analogy of a cracking whip is often used to explain the kinematic sequence in a golf swing. To make the tip of a whip snap, you don’t just move your whole arm at once. You move the handle, then abruptly stop it, passing that energy down the line.
In a golf swing, that energy moves through four main segments in a specific, proximal-to-distal (inner-to-outer) chain:
- The Pelvis: This is the engine. It starts the downswing, reaching its peak rotational speed first.
- The Thorax (Upper Body): As the pelvis begins to slow down, it passes that speed up to the torso.
- The Lead Arm: The torso then decelerates, catapulting the arms forward.
- The Club: Finally, the hands slow down, and the energy is dumped into the clubhead at impact.
When this chain works correctly, the golfer achieves maximum speed with minimum effort. When it doesn’t, they are essentially “fighting” their own body.
Identifying ‘Power Leaks’ in Your Students
Most amateur golfers suffer from a “top-down” sequence. Instead of starting with the pelvis, they fire their shoulders or hands first. This is the root cause of the classic “over the top” move and the dreaded slice.
As a coach, identifying these “power leaks” becomes much easier once you look for sequence issues rather than just swing planes:
- The Amateur Pattern: Often, the hands and shoulders peak in speed at the same time as the hips. This is like trying to crack a whip by moving the whole string forward at once — there’s no snap.
- The Deceleration Problem: A common misconception is that every body part should keep getting faster until impact. In reality, the pelvis must slow down so the torso can speed up. If a student “spins out” their hips without ever braking, they never actually transfer that energy to the ball.
- The Result: You’ll see casting, an early release, or a student who looks like they are swinging 100 mph, but the ball is only traveling 200 yards. They are working hard, but their sequence is inefficient.
Using Onform’s Kinematic Sequence Feature
Historically, measuring kinematic sequence required a high-tech setup, with electromagnetic sensors taped to the student and wires everywhere. For the average club pro, it simply wasn’t practical.
With Onform’s new Kinematic Sequence feature, you can stop guessing about the energy transfer in your student’s swings by simply recording them as normal with an iPad or phone.
Our new Kinematic Sequence Graph shows you how the pelvis, torso, and arms accelerate to create power, allowing you to see the timing, find the speed, and help your students hit the ball further.
Video Capture Guidelines

| Parameter | Recommendation |
| Camera Angle (Face-on) | Just as it does for 2D video, recording angles matter. We recommend pointing at the center of the golfer, ideally perpendicular to the target line. Try to keep the camera as level as possible. |
| Camera Height | Place between the waist to chest level of the golfer |
| Distance from Golfer | Golfer’s height is at least 50% of the video frame |
| Lighting | Well-lit, evenly distributed |
| Clothing | Avoid loose, baggy outfits that obscure joints |
| View Obstructions | Ensure the full body is visible throughout the swing. If possible, avoid background noise, such as other golfers. |
How to Integrate It Into a Lesson:
- Capture: Record the student from a face-on perspective at a high frame rate (120 fps or higher).
- Compute: Onform’s AI analyzes the motion of the pelvis, thorax, and lead arm, generating a kinematic graph in seconds.
- The Visual Proof: Instead of telling a student they are “using their arms too much,” you can show them the graph. If the “hand speed“”” line peaks before the “pelvis” line, the student can see the evidence of their inefficiency.
This allows you to move from “I think you’re doing this” to, “The data shows you’re doing this.” It builds immediate trust and gives the student a clear, measurable goal for their next practice session.
Rose, G., & Phillips, D. (n.d.). Kinematic sequence basics. MyTPI. https://www.mytpi.com/articles/biomechanics/kinematic-sequence-basics
fitzygolfpro. (2017, April 2). The kinematic sequence of a golf swing explained simply [Video]. YouTube. https://www.youtube.com/watch?v=6TXod7SmRTU
Onform. (2025, September 30). Feature release: 3D data now available for golf. Onform Blog. https://onform.com/blog/feature-release-3d-data-now-available-for-golf/
Onform. (2025, September 30). Onform launches fast, reliable, and accessible markerless 3D motion capture for golf. Onform Blog. https://onform.com/blog/onform-launches-fast-reliable-and-accessible-markerless-3d-motion-capture-for-golf/
Control iPad
The Control iPad feature allows you to use your iPad as a control device. This allows you to freely walk around and easily provide your student with instant feedback as the iPad would be controlling other Apple devices' recordings while the iPad does not record.
Voiceover
Voiceover Feedback & Analysis
The Voiceover feature is a powerful tool for providing clear, synchronized audio and visual feedback. It allows you to transform a standard video into a personalized lesson by recording your voice and on-screen annotations simultaneously.
Creating a Voiceover
To begin, open any video in your library or workspace and tap the Microphone icon. You will be presented with two recording modes:
- Record Screen & Microphone: Captures both your on-screen drawings and your spoken commentary for a complete instructional experience.
- Record Screen Only: Captures your technical annotations and movements without recording external audio.
Advanced Instructional Tools
While recording, you can utilize the full suite of analysis tools to enhance your message:
- Drawings: Add lines, circles, angles, text and more to highlight postural or mechanical points.
- Tool Customization Options: Once you have selected a drawing tool, you can fine-tune its appearance to ensure your annotations are clear and professional.
- Adjust Line Thickness: Tap the thickness icon to set the desired width for your drawing tool. This is particularly useful for differentiating between primary and subtle movement paths.
- Custom Color Selection: While five preset colors are visible, you can double-tap any color box to open the full palette color picker. This allows you to choose a custom hue that stands out against any background or athletic uniform.
- Comparisons & Overlays: Use side-by-side or overlay views during the recording to show progress or compare an athlete against a model performer.
Non-Destructive Editing
When a voiceover is completed, Onform generates a new, independent video file. Your original "raw" footage remains entirely untouched and preserved in your library, allowing you to create multiple different feedback sessions from the same source material.
** Refer to the Pen Icon for more information on how to interact with the tools
Invitations
Onform uses a secure invitation system to bring athletes, parents, and coaches into your digital coaching environment. There are two primary methods for connecting, depending on whether you are onboarding a single person or an entire group.
1. Individual Invitations
Best for high-touch, one-on-one coaching and private workspaces.
- Unique Access: Generates a one-time-use invite link and code. Once accepted, the code expires and cannot be reused.
- App Onboarding: Recipients are provided with direct links to download Onform on either iOS or Android.
- Join Codes: Users are given a 5-character alphanumeric code (e.g.,
Ab12Z).
Important: Join codes are CaSe SeNsItIvE. Ensure your athletes enter the letters exactly as shown to avoid errors.
2. Bulk Invitations
Ideal for mass communications, newsletters, or onboarding an entire roster at once.
- One-to-Many: Create a single link that allows multiple people to join a Team Workspace, an Individual Workspace, or a specific Collection.
- Automated Organization: When you create a Bulk Invite for a specific Collection, any individual who joins via that link is automatically sorted into that group on your Home Screen.
- Efficiency: This streamlined approach removes the administrative burden of generating dozens of unique codes when starting a new season, launching a clinic, or onboarding an existing client list to the Onform platform for the first time.
Invitation Workflow
- Send: Generate the invite (Individual or Bulk) and share it via SMS, email, or social media.
- Accept/Decline: The recipient receives the prompt. Once they accept, they are instantly added to the designated workspace or collection.
- Sync: Upon acceptance, the workspace automatically appears in the member's Onform app, and they can begin viewing shared content, share videos with you, and communicate immediately.
Sending Invitations / Sharing videos outside of the app
Secure External Sharing
While in-app sharing is the most efficient and secure way to collaborate with your athletes, Onform provides flexible options for sending videos and links to external recipients.
Device-Integrated Email Sharing
To ensure high deliverability and protect your privacy, Onform does not send emails or video files directly from its own servers. Instead, the app integrates with your device's native email client (such as Apple Mail, Outlook, or Gmail).
- Spam Prevention: By using your own configured email client, your messages are less likely to be flagged as spam, ensuring your athletes actually receive your feedback.
- Flexible "From" Addresses: You can configure your device's email client with multiple accounts. This allows you to send professional communications from a business email address, even if that address is different from the one used for your Onform SSO login.
- Confirmation Required: Before inviting new clients or sharing videos externally, ensure you have a properly configured and active email account set up in your device's system settings.
Sharing Options
When you choose to share a video externally, you can select from several methods:
- In-App Share: Directly post the video into an Individual or Team Workspace.
- Share Link: Generate a secure URL that can be pasted into a text message or social media post.
- Email Video/Link: Automatically open your email client with the video or link pre-attached and ready to send.
- Export to Other Apps: Send the file directly to other installed apps on your device or save it to your local Camera Roll.
Sharing Options / Exporting Videos
Onform provides multiple pathways to distribute your video content, whether you are communicating within the platform or sending files to external stakeholders. You can perform these actions on a single video or select multiple files to export simultaneously.
1. Internal Sharing (In-App)
The most secure method of collaboration is sharing directly within the Onform ecosystem.
- Workspace Sharing: Instantly move or copy videos to members within the same workspace.
- Cross-Workspace Sharing: Send videos to different individuals or teams without having to re-upload the file.
2. External Sharing (Outside the App)
To access external sharing options, tap the "..." (More Icon) on the share screen to reveal the following tools:
| Method | Description |
| Share via Email | Launches your device's default email client to send a secure link. Recipients can view the video in a browser, download it, or save it directly into their own Onform app. |
| Copy Link | Generates a shareable URL that you can manually paste into SMS, WhatsApp, or other communication platforms. |
| Share to Other Apps | Sends the video to third-party apps installed on your device (e.g., Slack, Instagram, or Dropbox). You can customize which apps appear in this list. |
| Save Video | Downloads the file directly to your device’s Camera Roll or Photos app. |
| Save to File | Exports the video(s) to your device’s internal file storage system (e.g., iCloud Drive or On My iPhone). |
Important Technical Notes
- Cloud Downloads: If a video is currently stored exclusively in the Onform Cloud—indicated by the Cloud/Down Arrow icon—it must be downloaded to your local device before it can be shared or exported externally.
- Automatic Processing: You do not need to trigger the download manually. The system will automatically begin pulling the file from the cloud the moment you elect to share or export it outside of the app.
- Connectivity Tip: Ensure you have a stable internet connection (Wi-Fi is recommended for high-resolution 1080p or high-FPS files) to ensure a smooth and rapid transfer.
- Email Configuration: Because Onform uses your device's native email client, ensure your mail app is properly set up with the account you wish to send "from."
Messaging
Messaging your clients
You can message your entire client list, a specific Collection, or individual members of a workspace.
Client list — Tap the more icon at the end of All Individuals or All Teams to broadcast a message to these pre-configured Collections. Before sending, you can narrow who receives it:
- Everyone
- Everyone except staff
- Just clients
- Just parents
Every broadcast goes out as a private 1:1 message, so any reply stays between you and that person.
Collections — The same options apply to Teams and Collections.
Individuals — When a workspace has more than one member, tap a member's name to message them directly. In a 1:1 workspace, just tap Chat.
Threaded messages
Long-press any message to open the sub-menu, where you can start a thread or reply within one.
Scheduled messages
After composing a message, long-press the send icon to choose when it's delivered.
Pinned messages
Long-press any message to pin it for quick access. Tap the thumbtack icon at the top of the message panel to filter and view all pinned messages.
Note: When sharing videos with your clients, you can also add a text message that accompanies the share and appears alongside the videos in their chat. Your clients have this same option when sharing with you.
Calendar API
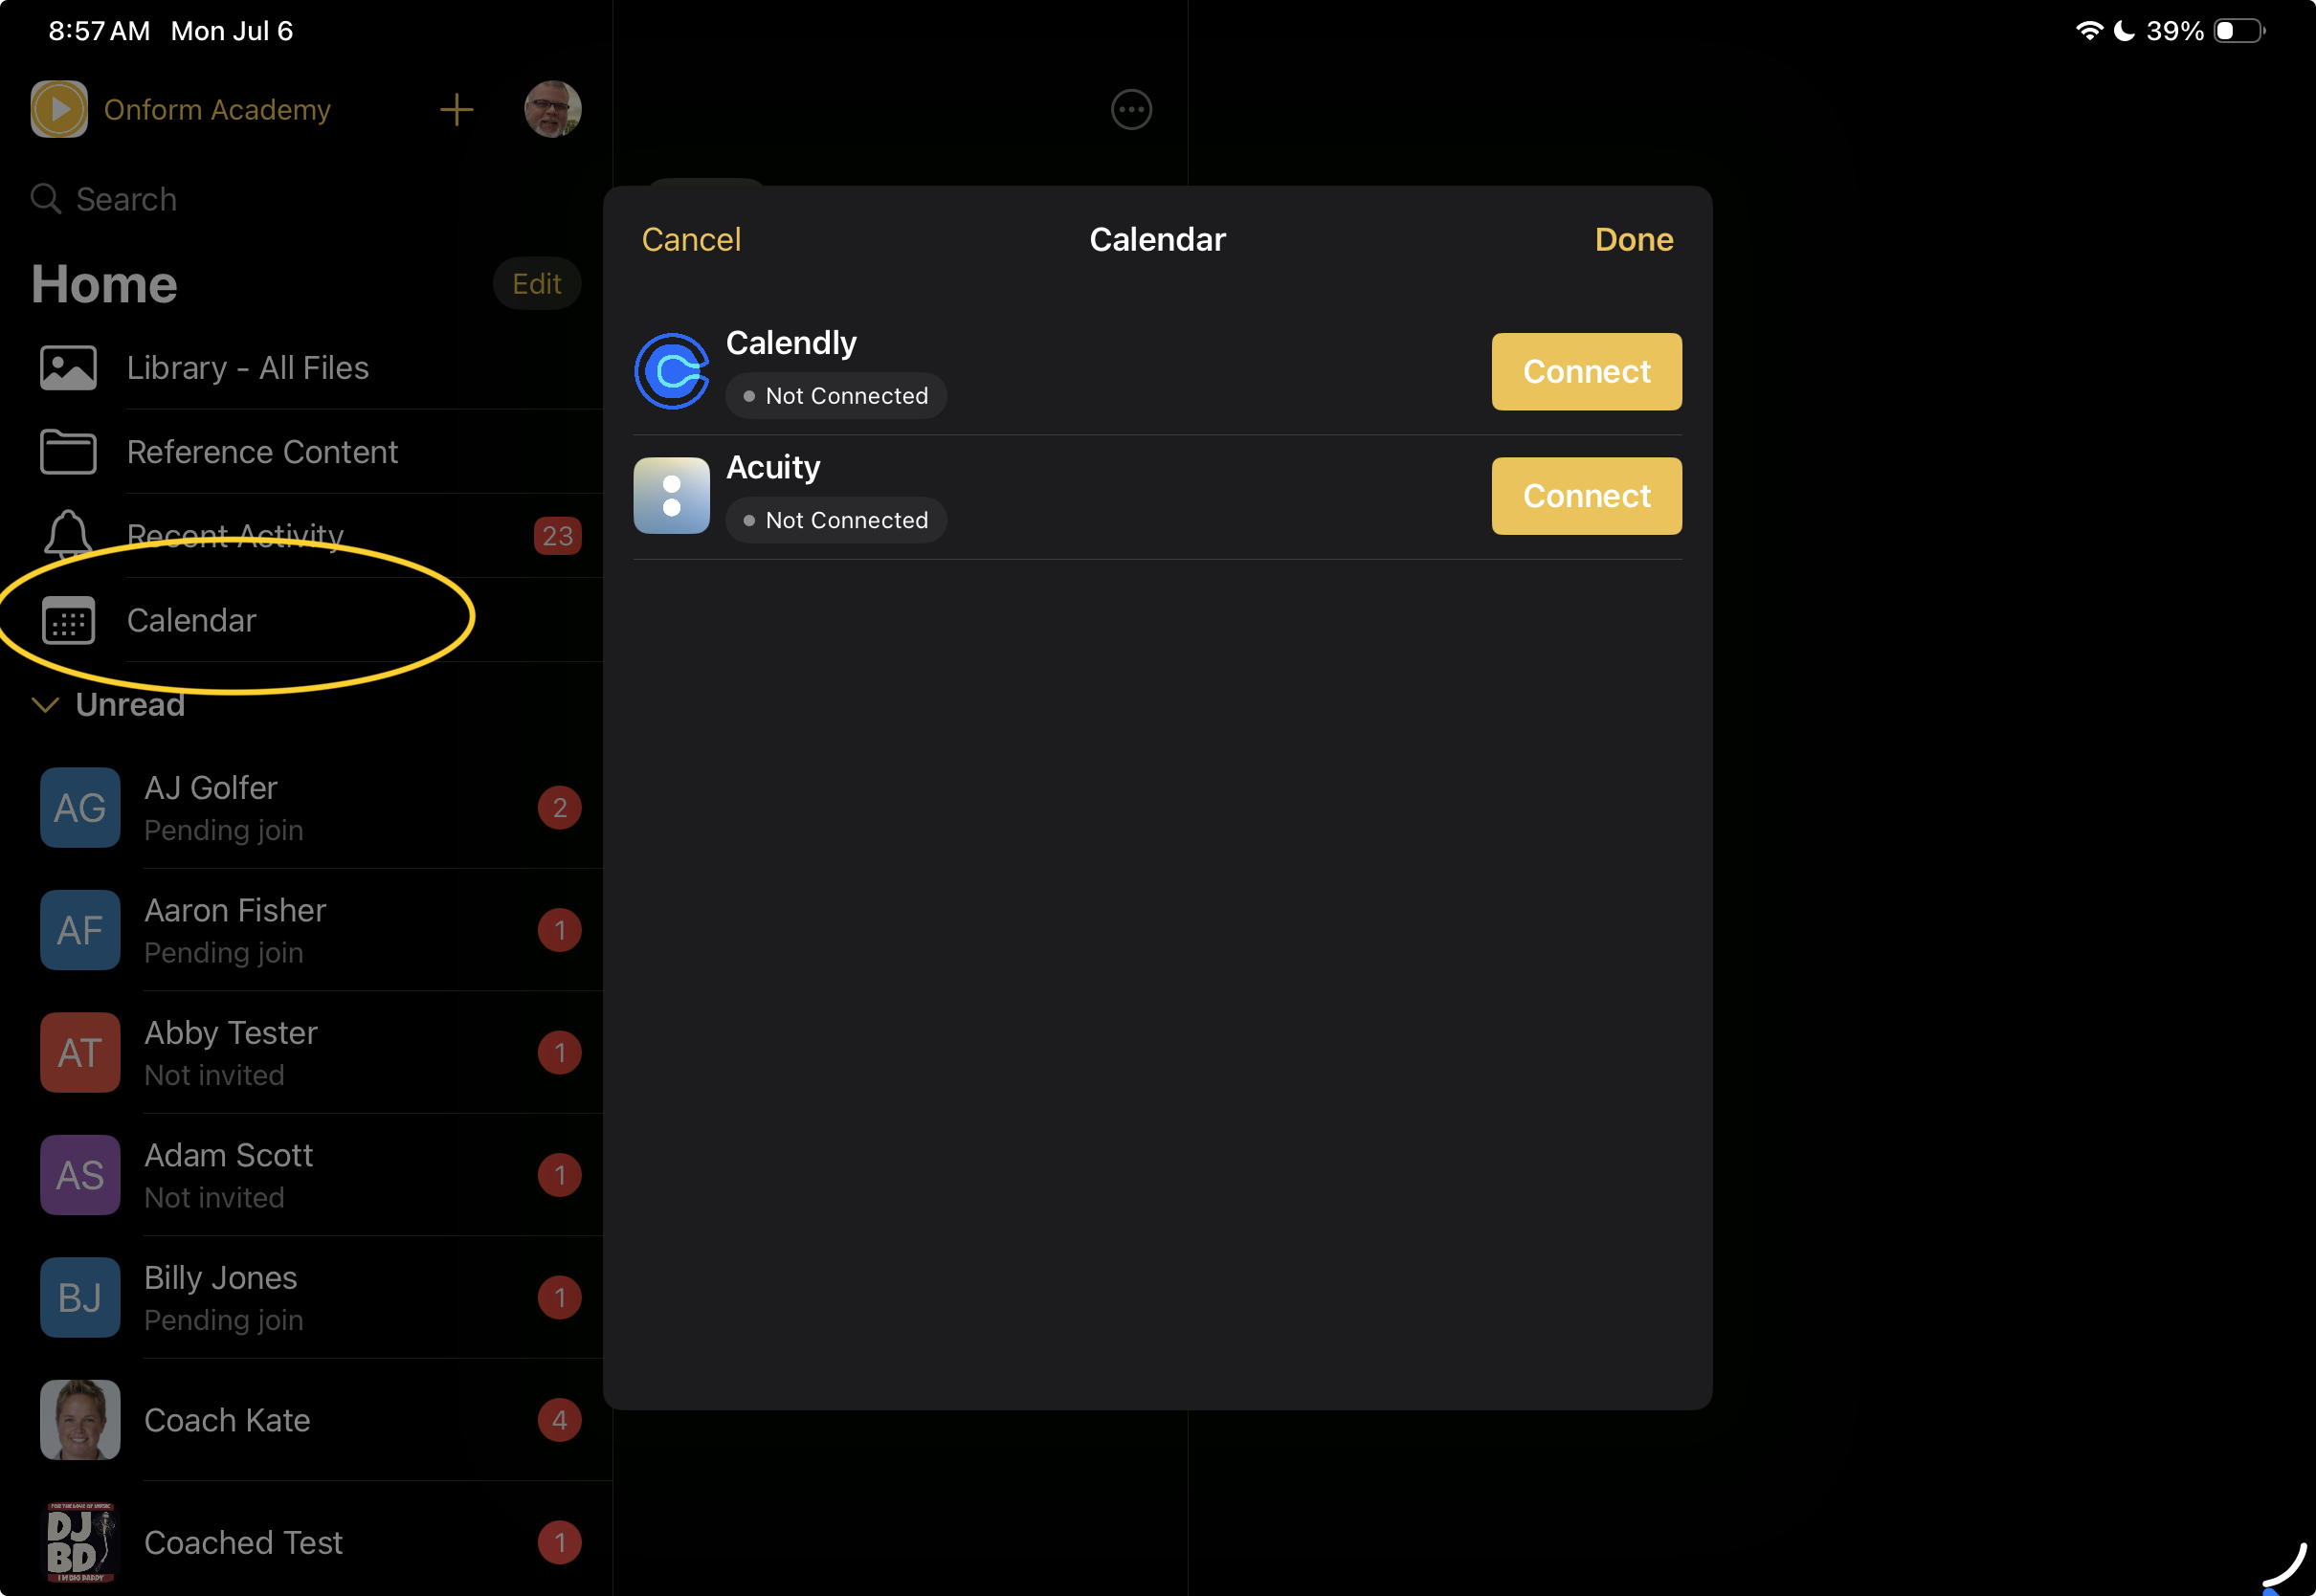
Tap Calendar on the Home screen to connect your Calendly or Acuity account through our API. Once connected, your clients can tap Calendar in their own Onform account to book a lesson.
User Guide
Organization Access
With the release of version 4.0, Onform has introduced advanced administrative tools designed specifically for multi-coach and multi-location academies, facilities, and large organizations. these features provide a high-level command center for managing staff-to-athlete relationships and data silos across your entire business.
Scalable Infrastructure
- Multi-Organization Setup: Establish separate "Organizations" for each facility or academy under your management. This allows you to silo athletes and coaches, ensuring that data and communication remain within the correct regional or functional branch.
- Staff Administration: Centrally manage your coaching staff, monitor active invites, and view a comprehensive list of athletes connected to each specific coach.
Athlete & Coach Logic
- Centralized Onboarding: Organization administrators have the ability to streamline the onboarding process by instantly connecting athletes with the appropriate coaching staff.
- Instant Staff Assignment: When an administrator adds a new athlete to the organization, they can immediately assign additional staff members to that athlete's workspace.
- No Manual Invitations: There is no need to send separate invitations to your staff; the athlete’s workspace will automatically appear in the designated coaches' accounts.
- Seamless Access: This ensures that your coaching team can begin reviewing footage and providing feedback the moment an athlete is added to the system.
- Dynamic Rostering: Easily add or remove coaches from the organization as your staff changes.
- Bulk Assignments: Use the Bulk Re-assign tool to shift entire groups of athletes from one coach to another—ideal for coaching transitions, end-of-season shifts, or staff departures.
Benefits for Administrators
| Feature | Administrative Value |
| Siloed Locations | Maintains privacy and organization across different physical sites. |
| Coach Visibility | Provides a "bird's eye view" of every coach’s current roster and activity. |
| Rapid Re-assignment | Prevents data loss or communication gaps when a coach leaves the organization. |
Manage Staff
Access the Manage Staff screen by tapping your organization name.

Add Staff
The Add Staff function is the primary tool for building your digital organization. It allows you to register and verify every coach and administrator within your facility or academy.
The Onboarding Process
- Invite Staff: Tapping the "Add Staff" link allows you to enter the details of each staff member. This sends an invitation for them to officially connect with your organization.
- Authentication: Once they accept, they are added to your organization's directory, enabling centralized management and athlete assignment.
Important Note: Inviting a staff member to the organization does not automatically create a workspace for them. It simply registers them as a verified coach within your professional network.
Creating Staff Workspaces
If you need a dedicated space to collaborate with a specific coach (for staff training, performance reviews, or internal communication), you can create one manually:
- Tap the "+" icon on your Home Screen.
- Select Add Individual or Add Team.
- Choose the staff member from your Existing Organization List.
- The workspace will be created instantly, and because they are already part of your organization, it will automatically appear on their device.

Enter the name of your staff person and optionally set them as an Admin of the org, which provides additional permissions for adding and removing people and videos within the org.

Remove and Re-assign
Managing staff departures is a streamlined process in Onform, ensuring that athlete data and communication history are never lost during a coaching change. The Re-assign feature allows for a seamless handoff between an outgoing staff member and their successor.
How to Remove and Re-assign Staff
To remove a coach who has left your organization, follow these steps within the Staff List:
- Access Staff Details: Tap on the name of the departing staff member to open their specific details page.
- Initiate Removal: Tap the More icon (...) in the top right corner and select "Remove from organization and re-assign athletes."
- Select a Successor: You will be prompted to choose a replacement staff member from your existing organization list.
What Happens During Re-assignment?
Once the transition is confirmed, the system automates the following:
- Workspace Integration: The new staff member is automatically added to every workspace (Individual and Team) previously connected to the departing coach.
- Data Continuity: All videos and analysis remain intact within those workspaces, allowing the new coach to review the athlete's progress immediately.
- Silo Maintenance: The departing staff member’s access is revoked across the entire organization, securing your facility's data.
Pro Tip: This "Seamless Transition" model is ideal for academies where multiple coaches may rotate through a single athlete’s development plan or when a head coach needs to take over a departing assistant’s roster.

+ (Add Workspace)
Enter an invite code to add a new individual workspace, add a new team, or accept an invite from another coach.
Profile (picture or initials)
-
Profile Page
- Online Status: Toggle your status between Online or Away.
- Clear Notifications: Instantly wipe all unread notification badges.
- Edit Profile: Update your name, change your role, or set a Lesson Booking link (e.g., Calendly).
- Workspace Branding: Set custom logos or images for each individual workspace.
- Manage Coach Upgrades: Distribute or revoke coaching licenses if you manage multiple seats.
- Manage Subscription: View your current plan, expiration date, and auto-renew status.
- Kiosk Mode: Use "Sign in to another device" to simplify swing recording at indoor facilities or simulators.
- Link/Unlink Sign-in: Manage your Apple, Google, or Microsoft IDs. Adding an alternate must use a different ID type than your original.
-
Logout: View your current login ID and end the active session.
Icons & Support
- Circle and Question Mark: View your currently installed Onform App version and access help resources.
- New Features Blog: Stay up to date with the latest platform releases and coaching insights.
- Tutorial Videos: Access our YouTube channel for self-paced learning and how-to guides.
- Rate Onform: Share your feedback on the App Store or Google Play Store.
- Contact Support: Directly reach out to our team for technical assistance.
- Cog Wheel: Open the Settings menu to customize app behavior.
- Close: Exit your profile and return to the main dashboard.
-
Settings
Privacy & Permissions
Manage how Onform interacts with your device resources:
- Photos: Grant access to import or export videos from your camera roll.
- Bluetooth: Required for connecting external sensors or devices.
- Local Network: Essential for Multi-cam synchronization and network-based syncing.
- Microphone: Necessary for recording voice-overs and using voice commands.
- Speech Recognition: Enable this to remotely start or stop recordings via voice.
- Camera: Allow the app to use your device's lens for capturing footage.
- Apple Intelligence and Siri: Integration for advanced OS-level shortcuts and features.
- Notifications: Toggle alerts and customize how you receive app updates.
- Background App Refresh: Permits the app to sync data while minimized or backgrounded.
Cloud Sync & Storage
- Automatic Management: Set a specific timeframe for how long videos stay on local storage before being offloaded to the cloud.
- Clear Cache: Manually wipe local video data; includes an option to also clear Reference and Starred videos.
- Recover Missing Videos: A diagnostic tool to retrieve unsynced files after an app or device crash (use only if directed by support).
- Sync Over Cellular: Allow data transfers over your mobile network when Wi-Fi is unavailable.
- Serialize Uploads (Advanced): Forces files to sync one at a time to improve stability on poor data connections.
- Disable Background Uploads (Advanced): Prevents the app from uploading data when it is not the active window.
-
Disable Pro-active Downloads: Prevents shared files from downloading automatically, allowing you to select only what you need.
Video Player
- Left-Handed Controls: Reverses the UI layout (Skeleton, Coach Cam, and Drawing tools) for easier left-handed access.
- Two-Finger Drawing: Requires two fingers for annotations to prevent accidental marks.
- Disable HD Aspect Ratio Voiceovers: Captures the full screen of your iPad/iPhone; note that this does not support standard HD dimensions.
- Skip Voiceover Sharing: Automatically saves voiceovers without prompting to share immediately.
- Disable Automatic Saving of Drawings: Automatically erases annotations when you exit a video (unless recording a voiceover).
- Flywheel Scrubbing: Change the default direction (right-to-left) for advancing or rewinding through a video.
-
Voiceover Quality: Choose between Better or Best quality (Best results in larger files and slower sync times).
Camera Settings
- Max Recording Limit: Set a cap of up to 60 minutes for manual recordings.
-
Disable Auto-detect Audio Cues: Turns off the automated "Swing detected" feedback prompts.
Optional Permissions & Notifications
- Speech Recognition: Toggle voice-controlled recording on or off.
-
Notification Control: Suppress "Video Watched" alerts so coaches are not notified when you view a file.
Customization & AI
- New User Invite: Customize the default language and text used for all outgoing invitations.
-
AI Models: Fetch the latest computer vision models (currently applicable for Golf; other sports coming soon).
App Info
- Send Logs to Support: Diagnostic tool used to help our team solve technical issues (use only when requested).
-
Version/Build: Displays the specific version and build number currently installed.
Account Settings
- Delete Account: Permanently erase your account and all associated files.
- Done: Close the settings menu and save changes.
Search
The Search tool is the fastest way to navigate your account, allowing you to bypass manual scrolling through various folders and groups.
- Universal Scope: A single search query scans across all Individual Workspaces, Team Workspaces, and Custom Collections simultaneously.
- How to Access: Navigate to your Home Screen and simply pull down on the list of athletes or teams. This gesture reveals the hidden search bar at the very top of the interface.
- Efficiency: This is particularly useful for coaches managing large organizations or multiple seasons, as it instantly filters your entire roster to find a specific person or group.
Edit
-
Home Screen & Collection Management
Organizing your workspace allows you to group athletes and teams by season, skill level, or location. Access these management tools by tapping Edit on your Home Screen.
Create New Collection
- Select Members: Choose the specific individuals and/or teams you wish to group together.
- Assign Name: Enter a custom title for your new Collection (e.g., "Varsity 2026" or "Morning Clinic").
-
Visibility: Use the Hide/Unhide toggle to clean up your Home Screen by tucking away off-season or inactive Collections without deleting the data.
Edit Collections
- Move Members: Seamlessly transfer individuals and teams between different Collections to keep your roster current.
- Modify Membership: Add new members to an existing group or remove those who are no longer part of that specific unit. You can also create invitations directly within the Collection.
- Reorder Layout: Tap and drag to rearrange the order of your Collections on the Home Screen, placing your most active groups at the top for quicker access.

Library Content Management
Each library serves as a central hub for your media, providing professional-grade tools for importing, exporting, and organizing your analysis.
- Importing Media: You can bring external footage into the app by importing .MP4 and .MOV files directly from your device’s storage or cloud services.
- Bulk Exporting: To save time, you can select multiple files simultaneously to export to your camera roll, email, or third-party storage apps.
- Search & Filter: Use the search bar to filter your library by Tags or Titles. This allows you to instantly isolate specific movements (e.g., "Fastball") or dates without scrolling through your entire history.
The creator of the workspace can set or change a workspace library to be default private or default shared
Recording a Video
-
Leveling Tool
Ensuring your camera is perfectly aligned is critical for accurate biomechanical analysis. The built-in Line Levels provide real-time guidance directly on your recording setup screen.
- Vertical and Horizontal Guidance: If your device is tilted, two separate lines will appear to help you find the correct orientation.
- Visual Confirmation: As you adjust the device, the lines will move toward each other. Once they overlap and turn green, your camera is perfectly level.
- Unobtrusive Interface: The level indicators will automatically disappear shortly after they turn green, leaving you with a clear view of your subject.
-
Multi-Cam Control (iPad Only)
With Version 4.0, your iPad can now function as a centralized Control Device for advanced multi-camera environments. This setup is ideal for capturing multiple angles (e.g., "Down the Line" and "Face On") simultaneously.
Connectivity & Hardware
- Primary and Auxiliary Roles: Set one iOS device as the Primary recording mode (Manual, Auto-Detect, Launch Monitor, or One-Tap) and up to three additional iOS devices as Auxiliary-Cams.
- Network Options: Devices connect wirelessly over a shared Wi-Fi network. For permanent studio installations, you can also hardwire them to a local area network (LAN) for maximum stability.
-
Coach Mobility: This centralized control allows you to move freely around the coaching area, triggering recordings from your iPad while the auxiliary iPhones remain fixed on tripods.
Multi-Cam Setup
To initiate the multi-angle capture:
- Prepare the Aux Devices: On your secondary devices (e.g., iPhones), switch the camera mode to Auxiliary-Camera.
- Connect to the iPad: Ensure your iPad is set as the Primary camera. The devices will discover each other over the network.
- Monitor the Feed: The iPad screen will split to show all connected angles. For example, the left view might show the iPad's own camera, while the right panel displays the feed from the auxiliary iPhone.

When operating in a multi-camera environment, the iPad can transition from a recording device into a dedicated Remote Control Hub. This mode is specifically designed for coaches who need to manage their auxiliary cameras without using the iPad’s own lens.
-
Enabling Control Mode
By tapping the Multi-Cam Control button, you activate a streamlined interface with the following characteristics:
- iPad Camera Deactivation: The iPad’s built-in camera is turned off to save battery and processing power, shifting the device’s focus entirely to remote management.
-
Remote Triggering: You can start and stop recordings on your auxiliary devices (such as iPhones positioned on tripods) directly from the iPad interface.
Note: Voice commands are disabled while operating in this mode.
- Single Camera View: In this mode, the iPad displays a large, clear view of a single remote camera feed, allowing you to monitor the athlete's form from a distance while maintaining full control over the recording session.
-
Coaching Benefits
- Enhanced Mobility: You can stand next to your athlete to provide hands-on instruction while holding the iPad to trigger the "Down the Line" or "Face On" cameras at the exact moment of the movement.
-
Simplified Monitoring: By focusing on a single remote feed, you can more easily spot technical flaws in real-time before reviewing the synchronized multi-angle footage later.

Next, we added a second AUX camera and you can see the iPad now shows the view from either camera angle.

Remote Recording & Multi-Cam Functionality
The iPad interface allows for high-level control over multiple auxiliary devices, ensuring a synchronized capture of every movement.
- Unified Capture: Pressing the Start/Stop button triggers a simultaneous recording across all connected remote aux devices. The resulting files are saved directly to the local iPad.
- Versatile Modes: You can utilize any standard camera mode in this configuration, including Manual, One-Tap, Auto-Capture, or Launch Monitor.
- Device Capacity: The system supports a primary iPad and up to three auxiliary iOS devices.
- System Requirements: Multi-cam is exclusive to iOS devices (iPhone/iPad) running iOS 18 or newer.
- Duration Limit: To ensure rapid wireless transfer from the auxiliary cameras to the primary device, multi-cam recordings are limited to 15 seconds per clip.


-
Camera Interface Tools
These tools allow you to prep the scene and categorize your footage before you even begin recording.
- Mic: Toggle the microphone on or off to capture or mute environmental audio. This is ideal for eliminating background noise in busy gyms or studios.
- Skeleton Icon: A real-time coaching overlay that uses AI to track an athlete's skeleton. Use this to help set your client’s starting position live on screen.
- Drawing Tool: Access the full suite of annotation tools while in the live camera view to highlight target areas before hitting record.
- Tag Video: Apply pre-set tags to the footage so the video is automatically categorized the moment it is saved.
- Tag Individual: Specifically useful for Team Workspaces or the All Files Library. This allows you to assign the video to any member of the workspace or any individual in your roster.
- Timer: Displays the current duration of the recording in real-time.
- Back/Front: Switch between the device's front-facing lens, rear-facing lens, or connected External Cameras (such as UVC or SLR setups).
-
Technical Image Controls
Fine-tune the visual quality of your capture to ensure the best possible analysis.
- Shutter Speed & ISO: Access these via the "+/-" button at the top of the screen.
- Shutter Speed: Higher speeds provide crisp stop-motion for fast movements (like a golf swing or pitch).
-
ISO: Adjust this alongside shutter speed to maintain proper brightness. Settings are saved between sessions for consistency.
Resolution & FPS (Frames Per Second):
- Resolution: Choose between 1080p or 720p. Higher resolution provides a sharper image with less distortion when zooming in on mechanics.
- FPS: Controls the smoothness of motion. High FPS (120 or 240) is essential for high-speed action and high-quality slow-motion review. 30 FPS provides a standard cinematic appearance.
- Record: Tap to manually initiate or conclude a video capture.
- Recording Mode (Manual): The default mode for manually starting and stopping each recording session.
- Shutter Speed & ISO: Access these via the "+/-" button at the top of the screen.

-
One-Tap Recording
The One-Tap mode is designed for "reactive" recording, allowing you to focus on the athlete and only save the video once you've seen the action occur. It uses a continuous buffer to capture the moments leading up to and following your tap.
- Pre-Tap Duration ($X$): The number of seconds the app "remembers" from the moments before you tap the screen. This can be configured for up to 15 seconds.
- Post-Tap Duration ($Y$): The number of seconds the app continues to record after the tap occurs. This can be set for up to 60 seconds.
- Resulting Video: The final clip is a seamless combination of both segments ($X + Y$).
- Standard Setting: By default, the app is set to 3s before and 2s after, creating a concise 5-second highlight of the specific move.

-
Auto-Detect (AI Video Assistant)
Auto-Detect utilizes a specialized machine learning model designed to act as your digital video assistant. It automates the tedious parts of filming, allowing you to focus entirely on the athlete or your own practice session without ever touching the device.
Supported Perspectives
The AI is currently trained to recognize and capture specific athletic movements from the following angles:
- Golf: optimized for both Face On and Down The Line views.
-
Baseball: optimized for both Hitting (Swing) and Pitching from the Open Side.
Automated Workflow
Once activated, the AI assistant manages the entire recording lifecycle:
- Hands-Free Capture: Every swing or pitch is automatically detected and recorded in real-time.
- Precision Clipping: The app identifies the start and end of the move, trimming the footage into a concise clip.
- Instant Organization: Each video is automatically titled and saved to the library, ensuring your data remains organized and easy to manage without interrupting the flow of a practice session.

- Launch Monitor
- Connect a supported Launch Monitor to include a data overlay from your launch monitor. Currently supported: Garmin Approach R10 and Full Swing KIT
- Auxiliary-Cam (Multi-Cam)
- allows simultaneous recording from up to 4 angles of a single action using multiple iOS devices.
- Note: Make sure you are logged into the same account and recording from the same workspace on both devices.

-
Close
- Close the recording window
Previewing a Video
Video Analysis & Player Interface
Tap any video thumbnail to enter the full-screen player. This interface provides professional-grade tools for reviewing mechanics and generating feedback.
Main Navigation & AI Tools
- Close (X): Tap to exit the video player and return to your library.
-
Skeleton Tracking: Available on iOS devices with an A15 Bionic chip or newer. This AI feature overlays a digital skeleton on a single athlete to track limb movement and joint angles.
Note: For optimal tracking, use high-quality lighting and ensure the athlete is not obstructed. Bulky clothing or complex backgrounds (like water) may interfere with the AI's ability to place tracking stems.
- Magic Stars (Golf Only): Add HandPath Tracking, Club Head Tracking (Beta), Slide & Sway Tracking, and Draw Swing Plane
- Microphone Icon: Start a Voiceover session. You can choose to record both your screen and audio, or capture a screen-only technical breakdown.
- Coach Cam: Embed a live video of yourself into your Voiceover. This is ideal for side-by-side demonstrations or adding a personal touch to your instruction.
-
Compare: Add a secondary video by importing a file, recording a new clip, or selecting one from any workspace.
Note: To save this dual-view analysis for an athlete, you must perform a Voiceover.
- More Menu ("..."): Access a comprehensive list of file actions including Sharing, Starring, editing Metadata (Title, Tag, or Person), Trimming, Deleting, or Flipping the video (reversing the orientation from right-handed to left-handed), and Rotating the video.
Annotation & Drawing Suite
Tap the Pen icon to access 10 specialized analysis tools. The icon saves your last used tool and color. You can adjust line thickness and double-tap color boxes to select custom hues.
- Line / Arrow: Draw straight lines or directional arrows to trace paths.
- Degree Line: Draw a single line to see its specific degree of slope.
- Angle: Create two connected lines to measure the exact degrees of a joint or spine angle.
- Circle / Box: Highlight specific body parts or zones of interest.
- Free-form Line / Arrow: Sketch custom paths or arrows for more fluid movement tracking.
- Timer: Overlay a stopwatch to measure the duration of a specific movement or phase.
- Ruler: Calibrate a distance measurement on a single plane to provide real-world scale.
- Text: Add text as a part of your voice-over.
- Undo / Clear: Remove your most recent mark or wipe all drawings from the frame instantly.
Playback & Scrubbing Controls
- Speed Control: Adjust playback from 2X speed down to 1/8X slow motion.
- Loop: Tap the double-arrow icon to repeat the video automatically.
- Macro Scrubber: Slide the gold ball to navigate through the entire video quickly.
- Frame Scrubber: Drag the vertical lines for high-precision, frame-by-frame navigation.
- Playback Buttons: Use the Back or Forward buttons to move exactly one frame at a time, or hit Play to watch at your selected speed.
Multi-Panel Selector
When multiple panels are being viewed, each panel has an option to select different viewing options. Use this selector to set up the view that works best for you.
Note: To display multiple panes, select the Layout button at the bottom right of your screen to access more viewing options.
4-Way Video Player (Version 4.0)
The introduction of the 4-way video player in version 4.0 marks a significant leap in multi-angle analysis. This feature is specifically engineered to handle complex multi-cam captures, providing a holistic view of an athlete's movement from every perspective simultaneously.
Simultaneous Multi-Angle Playback
- Quad-View Visualization: Play back up to four different angles of a single multi-cam recording at the exact same time. This allows you to sync "Face On," "Down the Line," "Top Down," and "Behind" views into one unified display.
- Synchronized Review: All four panes remain perfectly in sync as you scrub, play in slow motion, or move frame-by-frame, ensuring you see exactly how a lead hip move affects the shoulder position from every angle.
Comprehensive Analysis Integration
The 4-way player doesn't sacrifice any of Onform’s core feedback tools. While in quad-view, you can still utilize:
- Comparisons & Overlays: Compare the 4-way capture against a model performer or a previous session.
- Voiceovers & Coach Cam: Record your audio feedback while the four angles play, and use the Coach Cam to demonstrate a move in the corner of the screen.
- Drawing Tools: Annotate any of the four panes to highlight technical details across all perspectives.
Coaching Use Case
| Sport | 4-Way Configuration Example |
| Golf | Face-On, Down-the-Line, Behind, and Impact |
| Baseball | Open Side, Catcher’s View, Pitcher’s View, and Tight-on-Grip. |
| Track & Field | Start Block Side, Front-On Lean, Feet/Ground Contact, and Full Lane view. |
For a quick tour of the new features of the video player, see the image below. Including the new Magic Button for 3D golf swing captures, angle selector, view-panel selector and the traditional tools.

While we think it will be a very familiar experience, you'll have unprecedented control of how you view multi-angle videos, comparisons, and 3D visualizations all in one place.
Recording a Voiceover
-
To provide detailed feedback, tap the Microphone icon after opening any video. You will be prompted to choose between recording your voice and screen (for full commentary) or screen only (for silent visual annotations).
While recording, you have access to all drawing and analysis tools to emphasize your coaching points in real-time.
-
Voiceover Controls
-
Pause / Resume: You can pause the recording at any time. This allows you to switch videos, skip to a different section of the footage, or gather your thoughts before resuming the session.
Stop Recording: Tap the Timer (recording duration) at the top of the screen to end your voiceover and save the file.
Compare & Flip: Tap the Compare button while recording to:
- Add a secondary video for side-by-side analysis.
- Swap the current comparison video for a different one.
- Flip the footage to show a mirrored perspective (e.g., viewing a right-handed athlete as a left-hander).
-
-
Pro-Tip: Non-Destructive Feedback
Every time you complete a voiceover, Onform creates a brand-new video file. This ensures your original "raw" footage remains untouched and available for future lessons or different perspectives.
Miscellaneous
Long-pressing a Video Thumbnail
A Long-Press (tapping and holding your finger or stylus on a video thumbnail) reveals a shortcut menu for rapid file management and sharing.
- Share: Distribute the video to a specific team, an individual, or a selection of multiple recipients.
- Broadcast: Share the video privately with every member of a pre-defined Collection. Any responses from recipients are sent directly to you, keeping the conversation 1-on-1.
- Copy: Replicate the video and send it to other teams, individuals, or your personal Reference Content Library.
- Duplicate File: Create an instant copy of the video within the library you are currently viewing.
- Move File: Transfer the video entirely from its current location to a different workspace.
- Make Private: Restricts the recipient from further sharing the video within the app.
- Restrict Further Sharing: A global setting to prevent other users from sharing the file externally.
- Edit Title: Set a new name or modify the existing title of the video file.
- Edit Tags: Add, remove, or change the descriptive tags associated with the video.
-
Edit Person: Update the athlete or coach tagged in the video.
Note: Within a workspace, you can only tag current members. To tag someone from a different workspace, use the Library - All Files view.
- Remove from Cache: Manually delete the video from your device’s local storage to save space while keeping it safe in the Onform Cloud.
- Delete: Permanently remove the video file from the platform.
Long-pressing a Team Workspace name
Performing a Long-Press (tapping and holding your finger or stylus) on a Team Workspace name opens a management menu for administrative and organizational tasks.
- Edit Team Profile: * Modify Name: Change the official name of the Team Workspace.
- Library Sharing: Adjust the permissions for how media is shared within the group.
- Workspace Branding: Upload or update custom logos and colors for this specific team.
- Add New Person to Workspace: Generates a unique, one-time-use invite link and code for a single individual.
- Bulk Invite Athletes: Create a single invitation link that can be shared with multiple athletes simultaneously for efficient onboarding.
- Edit Collections Containing Workspace: View and manage which Custom Collections include this team. You can quickly add the team to new groups or remove them from existing ones.
- Move Workspace to an Organization: Transfer the entire workspace into a different Organization of which you are a member.
-
Leave This Workspace: Allows you to exit the team while keeping the workspace active for others.
Note: You must first designate another member as an Admin. Once they have administrative rights, you can leave the team, and ownership is handed over to them.
-
Delete This Workspace: Permanently removes the team workspace. Users will lose all access to the group and any shared videos.
Important: This action can only be performed by the Creator/Owner or a designated Admin.
Long-pressing an Individual Member’s name in a Team or Individual workspace
Workspace Member Management
A Long-Press (tapping and holding your finger or stylus) on an Individual or Team Workspace provides quick access to member permissions and role configurations.
-
Invite / Re-invite Member: Send a new or follow-up invitation to a user who has not yet joined or needs to reconnect to the workspace.
Edit Member Details: Modify the specific role of a user within your organization. Available role types include:
- Athlete: (The specific term may vary based on your sport).
- Parent: Ideal for youth sports coordination.
- Assistant: For support staff or junior coaches.
- Coach: (The specific term may vary based on your sport).
- Other: Custom role designation.
Role Capabilities & Requirements
| Role Type | Features & Limitations |
| Athlete & Parent | Includes unlimited video storage, sharing, and messaging within workspaces they are invited to by a Coach. These users are limited to 5 voiceovers per rolling 30-day period. |
| Coach & Assistant | Includes unlimited video storage, sharing, messaging, and voiceovers. These users must either have their own individual Coach Subscription or be assigned one of your available licenses. |
| Other | This role requires a valid coaching license to be purchased or assigned for full functionality. |
Note: If you are managing a large staff, you can distribute or revoke coaching licenses directly through your Manage Staff to ensure every Assistant or Coach has the necessary access.
- Edit Details:
- Change Role: Update a member's specific designation within the system.
- Change Name: Modify the display name of the workspace.
- Make Admin of Workspace: Grant a member administrative privileges, allowing them to add or remove people from the workspace.
- Add New Person to This Workspace: Use this to bring a parent, guardian, or an additional coach into an existing individual workspace.
- Edit Collections Containing Workspace: View which custom groups this workspace belongs to; easily add the workspace to new collections or remove it from others.
- Move Workspace to an Organization: Transfer the entire workspace into a different Organization that you manage.
- Leave This Workspace: You can exit a workspace while keeping it active by first appointing another member as an Admin. Once they have administrative rights, you can leave, effectively handing the workspace over to them.
-
Delete This Workspace: Permanently removes the workspace for all users, including all shared videos.
Note: This action is restricted to the Creator/Owner or a designated Admin.
Recently Deleted
When you delete a video, it is not immediately erased. Instead, Onform moves the file into a protective Recently Deleted folder to prevent accidental data loss.
Managing Deleted Files
- Accessing the Folder: In any Library, tap the Library dropdown menu at the top of the screen and select Recently Deleted.
- Recovering Files: If a video was deleted by mistake, you can restore it from this folder. Once recovered, the file will return to its original location in your library with all its tags and titles intact.
- Permanent Deletion: To manually free up space on your device's local storage, you can choose to delete files permanently from this folder.
Note: Permanent deletion is final—once a file is removed from the "Recently Deleted" folder, it cannot be recovered from the Onform Cloud.
Notes
-
Private Workspace Notes
The Notes section serves as a secure, coach-only ledger for tracking progress, goals, and internal reminders. It is designed to keep your professional observations organized without sharing them with the athlete or team.
Features & Visibility
-
Coach-Only Access: The Notes section is visible and editable only by the coach. Your clients, athletes, and parents cannot see or access any information stored here.
Workspace Specificity: Notes are tied directly to the workspace they are created in:
- Individual Workspaces: Contain private notes regarding that specific athlete's development, injury history, or mental game.
- Team Workspaces: Contain collective notes regarding team strategy, roster changes, or practice plans.
- Easy Recall: Use this section to quickly review past sessions or specific technical cues before starting a new lesson.
-
-
Coaching Tip
Use the Notes section to track "Coach's Eyes" observations that might be too technical or sensitive for the athlete to see, ensuring you have a consistent record of their long-term growth.
Web App
- https://app.getonform.com/
- A limited-functionality companion can be accessed through a web browser. It is recommended that you use the Chrome browser, as it is the primary supported browser and provides the best rendering of the app.
- All administration needs to be managed through the mobile app.
- Capabilities:
- Videos can be imported, exported, and viewed
- Limited voiceover recordings
- Send and receive chats
- Manage Organization Staff
App Feature Comparison: iOS v Android
Comparison of Available Functionality: Onform iOS and Android Apps
This document provides a side-by-side comparison of the core features and functionality currently available to Coaches and Individuals in the Onform mobile application on both Apple iOS and Google Android.
Coach Feature Comparison
|
|
IOS |
Android |
|---|---|---|
| Video Recordings |
✔️ |
✔️ |
| Recording Options |
Device and Camera Specific 720p to 1080p - 30 fps to 240 fps |
Device and Camera Specific 720P, 30 fps - 720P, 120 fps - 1080p, 30fps - 1080p, 240fp |
| Recording Modes |
Manual, One-Tap, Auto-Detect, Launch Monitor, Auxiliary Cam |
Manual |
| Loop Video Playback |
✔️ |
✔️ |
| Playback Speed Controls |
2X -1/8X |
2X -1/8X |
| Custom Video Tags |
✔️ |
✔️ |
| Library Search |
✔️ |
✖️ |
| Recent Activity |
✔️ |
✔️ |
| Reference Content |
✔️ |
✔️ |
| Voiceover Recordings |
✔️ |
✔️ |
| Compare Videos |
✔️ |
✔️ |
| Private and Group Chats |
✔️ |
✔️ |
| Team Workspaces |
✔️ |
✔️ |
| Individual Workspaces |
✔️ |
✔️ |
| Collections |
Create and Share |
Create |
| Organizations |
✔️ |
Access but can’t create |
| Manage Staff |
✔️ |
✖️ |
| Shared Collections |
✔️ |
✔️ |
| Pinned Messages |
✔️ |
✖️ |
| 2D Skeleton Tracking |
✔️ |
✖️ |
| FullSwing KIT/Garmin R10 Compatible |
✔️ |
✖️ |
| Sensor Edge Compatible |
✔️ |
✖️ |
| Pocket Radar Integration |
✔️ |
✖️ |
| Stalker Sport Radar |
✔️ |
✖️ |
| Auto-Detect Recording For Golf, Baseball, Softball |
✔️ |
✖️ |
| External UVC Camera Support |
✔️ |
✖️ |
| Golf Club Tracking |
✔️ |
✖️ |
| 3D Visuals and Data For Golf |
✔️ |
✖️ |
| Multi-Cam Video Recordings |
✔️ |
✖️ |
| Drawing in Live Camera View |
✔️ |
✖️ |
| Voiceover Drawing Tools |
11 Tools - Thickness and custom Color options |
4 Tools and 5 color options |
| Bulk Invite Athletes |
✔️ |
✔️ |
| Coach Cam |
✔️ |
✖️ |
| Scheduled Messages |
✔️ |
✖️ |
| Control iPad |
✔️ |
✖️ |
| 60 min Recording |
✔️ |
✖️ |
| Video Admin Portal |
✔️ |
✔️ |
| Language Options |
✖️ |
English, Spanish, Korean, Japanese |
| Settings |
Full Suite |
Limited |
Individual Feature Comparison
|
|
IOS |
Android |
| Video Recordings |
✔️ |
✔️ |
| Recording Options |
Device Camera Specific 720p to 1080p - 30 fps to 240 fps |
Device Specific 720P, 30 fps - 720P, 120 fps - 1080p, 30fps - 1080p, 240fp |
| Recording Modes |
Manual, One-Tap, Auto-Detect, Launch Monitor, Auxiliary Cam |
Manual |
| Loop Video Playback |
✔️ |
✔️ |
| Playback Speed Controls |
2X -1/8X |
2X -1/8X |
| Custom Video Tags |
✔️ |
✔️ |
| Library Search |
✔️ |
✖️ |
| Recent Activity |
✔️ |
✔️ |
| Reference Content | Golf, Track & Field | Golf, Track & Field |
| Voiceover Recordings |
Standard - 5/mo Premium - 20/mo Unlimited when attached to a subscribed coach |
Standard - 5/mo Premium - 20/mo Unlimited when attached to a subscribed coach |
| Compare Videos |
✔️ |
✔️ |
| Private and Group Chats |
✔️ |
✔️ |
| 2D Skeleton Tracking |
✔️ |
✖️ |
| FullSwing KIT/Garmin R10 Compatible |
✔️ |
✖️ |
| Sensor Edge Compatiable |
✔️ |
✖️ |
| Pocket Radar Integration |
✔️ |
✖️ |
| Stalker Sport Radar |
✔️ |
✖️ |
| Auto-Detect Recording For Golf, Baseball, Softball |
✔️ |
✖️ |
| External UVC Camera Support |
✔️ |
✖️ |
| Golf Club Tracking |
✔️ |
✖️ |
| 3D Visuals and Data For Golf |
✔️ |
✖️ |
| Multi-Cam Video Recordings |
✔️ |
✖️ |
| Drawing in Live Camera View |
✔️ |
✖️ |
| Voiceover Drawing Tools |
11 Tools - Thickness and custom Color options |
4 Tools and 5 color options |
| Control iPad |
✔️ |
✖️ |
| 60 min Recording |
✔️ |
✖️ |
| Standard & Pinned Messages |
✔️ |
✖️ |
| Language Options |
✖️ |
English, Spanish, Korean, Japanese |
| Settings |
Extensive |
Limited |